|
<< Click to Display Table of Contents >> Creating Projects and Scenarios |
  
|
|
<< Click to Display Table of Contents >> Creating Projects and Scenarios |
  
|
All input values, calculations and outputs in cncPAVE are stored per Scenario. Each Scenario belongs to a Project. By doing this, data is stored more logically. A user can create an unlimited number of Projects and Scenarios. Data can be kept forever, or deleted. For a specific Project (e.g. Ben Schoeman Highway) a user might have different Scenarios to view outputs for different variations of inputs applied (e.g. Constants and Variables). Before viewing outputs or doing calculations, a user should select a relevant Scenario first. Each Scenario created is of a certain Pavement Type. The different Pavement Types available are Jointed, Doweled, Continuously Reinforced and Ultra-Thin Continuously Reinforced. When accessing the system for the first time, cncPAVE will create a Default Project named Default. This Project can never be deleted. Under this Project, four default Scenarios will be created, one for each Pavement Type. Calculations will initially be performed on each Scenario. When signing in for the first time, keep in mind that it will take time to create the Default Scenarios and to perform Calculations on them. It is possible to delete these default Scenarios or to make changes to them. It is also possible to create other Scenarios under the Default Project. A Project and Scenario Name should always be relevant and descriptive.
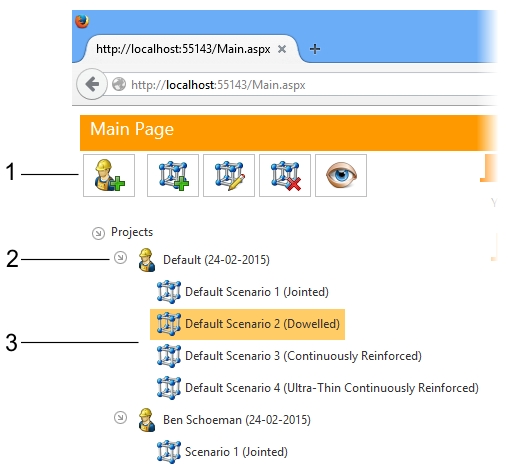
By looking at the top left of the Main Interface of cncPAVE, one should see the following:

At point 1, a number of buttons are found to:
• Add, Edit and Delete a Project
• Add, Edit and Delete a Scenario
• Run the Calculations function when the Control function is open and when a Scenario is selected.
These buttons appear and disappear as a Project or Scenario is selected. The Calculations button is only visible when a Scenario is selected and the Control function is open.
Point 2 illustrates a Project item. Under the Project a list of Scenarios are found. This is seen at Point 3. Below, each button will be discussed:
![]() Adding a Project
Adding a Project
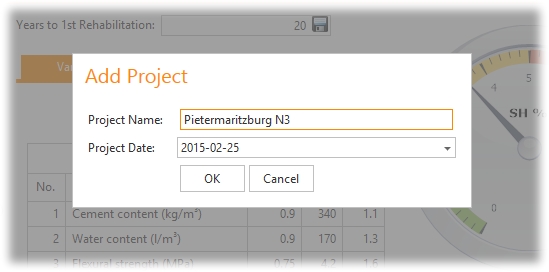
By clicking this button, the following window will appear:

Enter a descriptive and relevant Project Name and also specify the Project Date by typing the date in the format provided or by selecting a date by clicking the drop-down button next to the date box.
To Save the project, click the OK button. To cancel this operation, click the Cancel button.
![]() Editing a Project
Editing a Project
This button is only visible when a Project (except the Default Project) or Scenario (not under the Default Project) is selected. By clicking this button, the window above will appear. The procedure as with adding a Project is exactly the same. The Project Name and Date can be changed and Saved.
![]() Deleting a Project
Deleting a Project
This button is only visible when a Project (except the Default Project) or Scenario (not under the Default Project) is selected. When clicking this button, the system will confirm if you are sure that you want to delete the selected Project. If Yes is clicked, all Scenarios under this project and their relevant data will be deleted. This action is permanent and all data for this Project and its Scenarios will be lost.
![]() Adding a Scenario
Adding a Scenario
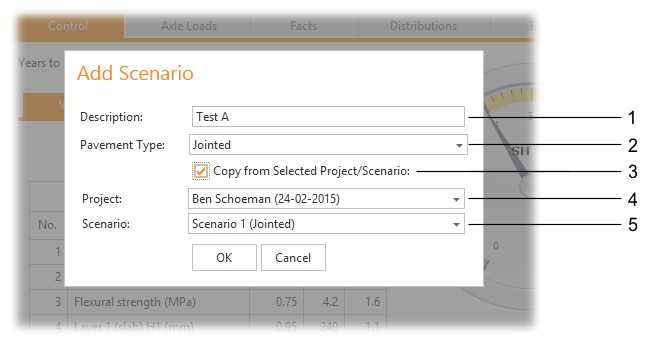
This button will be visible when a Project or Scenario is selected. A Scenario will be created for the selected Project or the selected Scenario's Project. By clicking this button, the following window will appear:

At point 1, please enter a descriptive and relevant Scenario description. At point 2 please select the Pavement Type this Scenario will be associated with. This cannot be changed afterward. At point 3, when checked, you can specify if another Project's Scenario values should be copied across when your new Scenario is created. Point 4 and 5 is relevant to point 3 and only applicable when the check box at point 3 has been checked. Point 4 and 5 is enabled when the check box at point 3 has been checked. At point 4 you can specify the Project from where values should be copied across to the new Scenario. The Scenario list at point 5 will be updated for the selected Project at point 4. All values from the selected Scenario at point 5 will be copied across when enabled by the check box at point 3. When a Scenario is selected as a base to work from, the Pavement Type will not be copied across.
To Save the new Scenario, click the OK button. To cancel this operation, click the Cancel button.
![]() Editing a Scenario
Editing a Scenario
This button will only be visible when a Scenario is selected. When this button is clicked, the window as discussed under Adding a Scenario will appear. Once a Scenario is created, it will only be possible to change the description of the Scenario. Again, the OK button should be clicked to save all changes.
![]() Deleting a Scenario
Deleting a Scenario
This button will only be visible when a Scenario is selected. When clicking this button, the system will confirm if you are sure that you want to delete the selected Scenario. If Yes is clicked, this Scenario and all related data will be deleted. This action is permanent.
![]() Performing Calculations
Performing Calculations
This button will only be visible when a Scenario is selected and if the Control tab is selected. Before clicking this button, all data (discussed later) should be correct and saved. Calculations will be performed and all relevant outputs will be updated.